
Choose what changes in a template
Turn layers into dynamic fields with a key, put variables inside text, and see the full list of keys a render can fill.
A dynamic field is a layer that changes each time you render. You give the layer a key, such as
headline, and then send a new value for that key with every render. This page shows how to make
dynamic fields, how to use variables inside text, and how to see every key a template accepts.
Make a layer dynamic
- Click the layer on the canvas, or in the Layers panel.
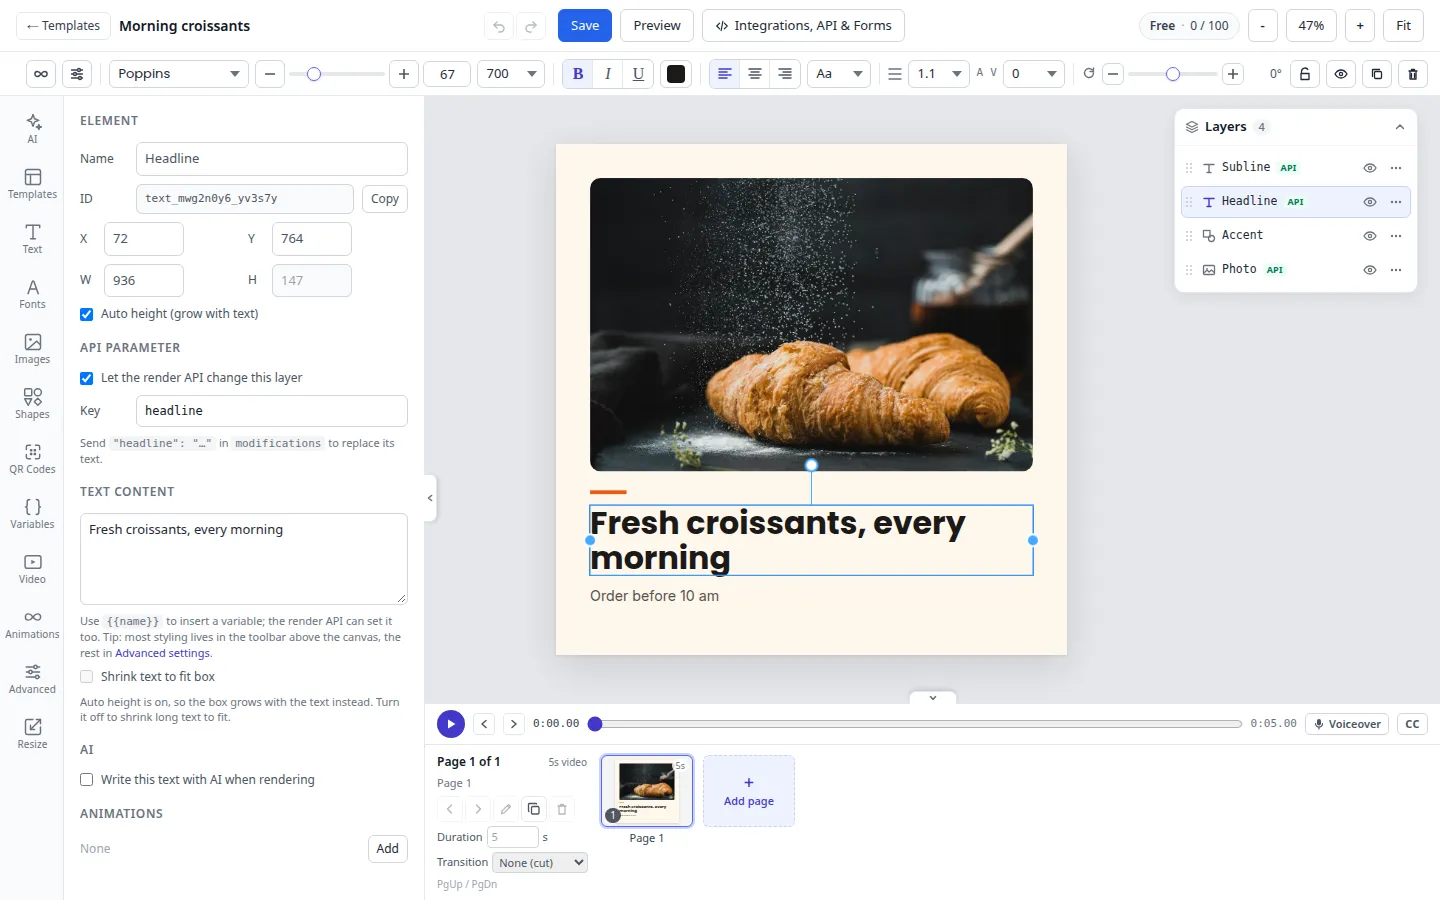
- In the properties panel on the left, find API parameter.
- Tick Let the render API change this layer. JamFrame suggests a key from the layer’s name. For
example, a layer called “Hero photo” gets the key
hero_photo. - Change the Key if you like. Under the key, the panel shows what to send, for example
"headline": "…". - Click Save in the top bar.
The layer now has an API badge in the Layers panel. To make it fixed again, untick the box.
You can also do this in Advanced settings. Select the layer, click Advanced settings in the toolbar above the canvas, and open the API tab. The same API parameter fields are there, plus the style overrides described below.
Rules for keys
| Rule | Example |
|---|---|
| Start with a letter. | headline, not 1headline |
After that, use only letters, digits, _ and -. No spaces or dots. |
hero_photo, cta-text |
| Use at most 64 characters. | |
| Upper and lower case are different. | Headline and headline are two keys |
If a key breaks a rule, the panel says why, for example Start with a letter. When you leave the field, it goes back to the last valid key.
One key on several layers
Keys don’t have to be unique. Layers that share a key all get the same value. This is useful when the same name or price shows twice in a design. When another layer on the page already uses the key, the panel tells you: “Also used by … One value will update all of them.”
A key can also be on several pages. See One key on several pages below.
What a value changes
The value you send replaces the whole content of the layer. What that means depends on the layer type:
| Layer | The value replaces | Example value |
|---|---|---|
| Text | Its text | "Summer sale: 30% off" |
| Image | Its image, as a public image URL | "https://example.com/photo.jpg" |
| QR code | The value the QR code holds, such as a link | "https://example.com/offer" |
| Shape | Its fill color | "#e11d48" |
Change the style too
A render can also change how a dynamic layer looks. Select the layer, click Advanced settings, and
open the API tab. Style overrides lists the properties a render can change, written as
key.property. Click the copy button next to one to copy it.
For example, this changes the headline’s text and color, and hides the layer with the key badge:
{
  "headline": "Summer sale",
  "headline.color": "#e11d48",
  "badge.hidden": true
}
Style overrides work only on layers that have a key. For every property and the values it takes, see Modifications.
Use variables inside text
A variable is a name in double curly brackets inside a text, such as Hello {{name}}!. Use one when
only part of a text changes. A render puts the value of name in place of {{name}} and keeps the rest
of the text as it is.
You can type {{name}} straight into a text layer, or into Text content in the properties panel.
The Variables tab helps you keep track of them:
- In the tool tabs on the left, click Variables.
- In the box at the bottom, type a name, such as
name, and click Add. - Type a sample value next to it, such as “Ana”.
- Put the variable in a text:
- Select a text layer, then click the variable (
{{name}}) in the list. It is added at the end of the text. - Or click the text icon next to the variable. It adds a new text layer with
{{name}}in the middle of the canvas.
- Select a text layer, then click the variable (
- Click Save.
Some things to know about variables:
- Name them like keys. Start with a letter and use only letters, digits,
_and-. The Variables tab accepts other names, but a render can’t fill a name with a dot, such asuser.name, because the API reads the dot as a style override. - Send a value for every variable. If a render doesn’t send one, it uses the sample value from the
Variables tab. If the variable isn’t in the tab either, the text shows
{{name}}as you typed it. - A key and a variable can share a name. Then one value fills both: the layers with that key and
every
{{name}}in text. - In QR codes, use a key instead. A QR value can hold a variable, but a render fills it only when the same variable is also used in a text layer. To change a QR code on its own, give the QR layer a key and send the whole value.
Preview with sample values
To see the design with sample values, click Preview in the top bar. Text and QR codes show the
sample values from the Variables tab instead of {{name}}. You can’t select or edit layers while
you preview. Click Exit preview to go back to editing.
See every key of a template
In the app
- Click Integrations, API & Forms in the top bar. On the Templates page, you can also open it from a template’s card.
- Stay on the REST API Integration tab.
- API parameters lists every key. Each row shows what the key takes (Text, Image URL, QR value, Fill color or Placeholder for a variable), the layers that use it, and on a template with several pages, the pages it is on.
In the editor, click a key in the list to select its layers on the canvas.
With the API
GET /v1/designs/{id} returns the same list as parameters:
curl https://api.jamframe.com/v1/designs/YOUR_TEMPLATE_ID \
  -H "Authorization: Bearer $JAMFRAME_API_KEY"
{
"design": {
"id": "clx8m2k3p0002abcd1234efgh",
"name": "Coffee tips carousel",
"pages": 3,
"parameters": [
{ "key": "title", "type": "text", "pages": [1, 2, 3], "example": "5 ways to brew better coffee" },
{ "key": "photo", "type": "image", "pages": [1], "example": "https://example.com/images/beans.jpg" },
{ "key": "brand", "type": "variable", "pages": [1, 3], "example": "Acme Coffee" }
]
}
}example is the value in the template now. For a variable, it is the sample value. See
Templates and renders for the rest of the answer.
One key on several pages
In a template with several pages, a key can be on more than one page. A carousel made from
New Design has a title key on every slide, for example. A plain title value sets every page.
To give one page its own value, put pageN@ in front of the key. Pages count from 1:
{
  "page1@title": "5 ways to brew better coffee",
  "page2@title": "Use fresh beans",
  "page3@title": "Grind just before you brew"
}
This works for style overrides too: [email protected]. See
Pages and carousels.
Send values
Every way to render takes the same keys:
- Test render: type them in Modifications (JSON) in the Integrations, API & Forms dialog.
- Dynamic URL: add them to the link, such as
?headline=Summer+sale. - Form: a new form gets one field for each key.
- Workflow: match the columns of your sheet or file to the keys.
- API: send them in
modifications.
A key that matches nothing in the template doesn’t stop the render. The API lists it in warnings, so
you can catch typos. For the full key syntax and every style property, see
Modifications.
Related
- Let AI write a layer’s text or make its image when you render: AI layers.
- Make each slide of a carousel: Pages and carousels.
- Render the same template in other sizes: Smart Resize.
Last updated
Still stuck?
Email [email protected] and a real person will reply. Tell us the template you were using and what you expected to happen.