
Try a template with a test render
Open the Integrations, API & Forms dialog, see which keys a render can change, copy a ready-made API request, and make a test render in the app.
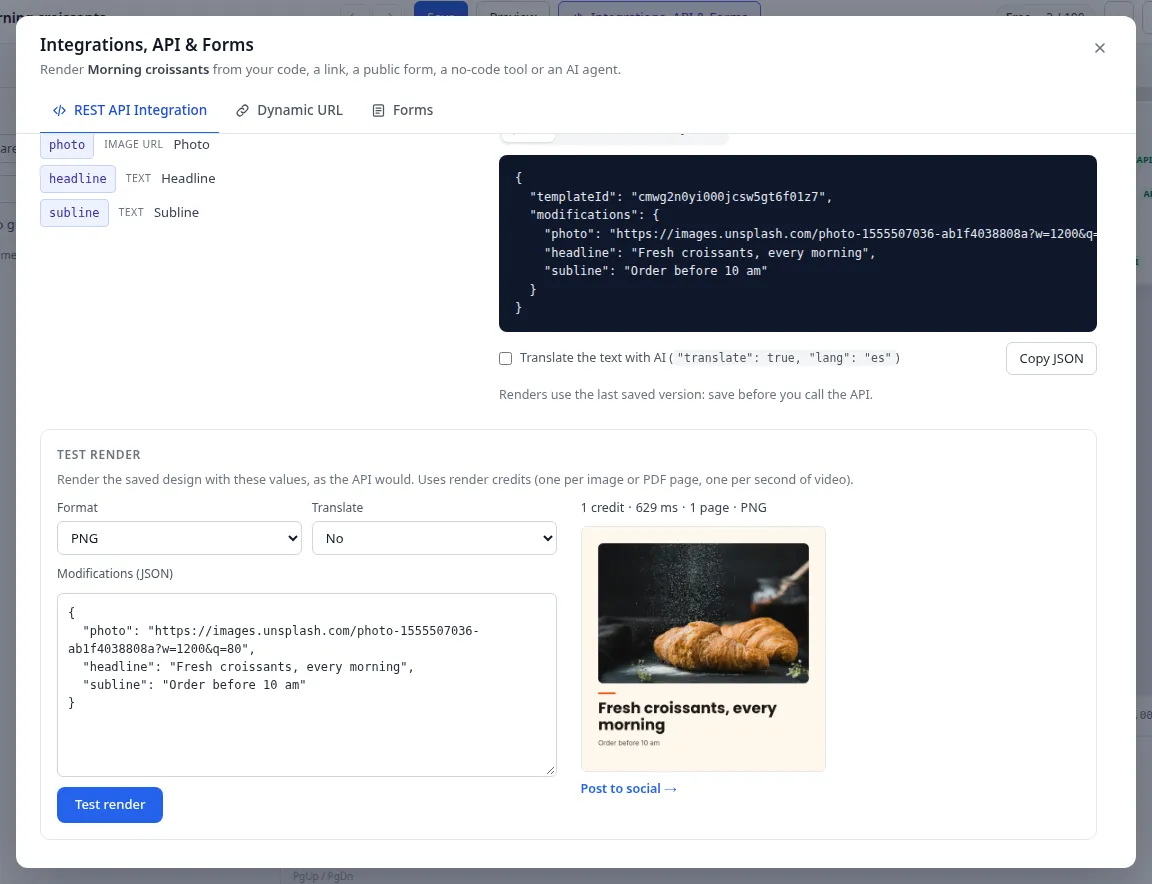
Before you use a template in a link, a form, a workflow or your own code, try it in the app. The Integrations, API & Forms dialog lists what a render can change, gives you a ready-made API request, and makes test renders. This page covers its first tab, REST API Integration.
Open the dialog
You can open it from two places:
- In the editor: click Integrations, API & Forms in the top bar. On a narrow screen the button says Integrations.
- On the Templates page: click Integrations on a template card.
The dialog has three tabs:
| Tab | What it does |
|---|---|
| REST API Integration | Lists the template’s keys, shows an example request and makes test renders. |
| Dynamic URL | A link that makes an image from the words in it. See Dynamic URLs. |
| Forms | A public page where anyone can fill in the template and download the file. See Forms. |
The dialog opens on the tab you used last. Press Esc to close it.
If you have view-only access to the workspace, the dialog shows View only. You can look at everything, but you can’t make test renders or change settings. See Team and roles.
API parameters
API parameters lists every key a render can change. Each row shows the key, its type and the layers it changes.
| Type | What you send | Example value |
|---|---|---|
| Text | New text for a text layer | Summer sale |
| Image URL | A public link to an image | https://example.com/beach.jpg |
| QR value | The text or link the QR code holds | https://example.com/offer |
| Fill color | A new fill color for a shape | #ff6600 |
| Placeholder | A value for a variable inside text, such as {{name}} |
Ada |
A type that ends in · AI belongs to an AI layer, which JamFrame fills when it renders. See AI layers.
In a template with several pages, each row also says where the key is, such as Page 2 or
Pages 1, 3. A key that is on several pages sets all of them. To set only one page, put the page
number in front of the key: page2@headline.
When you open the dialog from the editor, click a key to select its layers on the canvas.
If the list says No parameters yet., nothing in the template can change yet. Select a layer and turn
on API parameter, or type a variable such as {{name}} in a text layer. See
Choose what changes.
Copy the example request
Example request shows a POST /v1/render call with your template’s id and its current values. Use it
as the start of your own API call.
- Pick JSON to see the request body, or curl to get a command you can paste into a terminal.
- Optional: tick Translate the text with AI. The example then adds
"translate": trueand"lang": "es", which translates every text layer into Spanish. Translation uses AI credits. - Click Copy JSON or Copy curl. The button says Copied! when it’s done.
The curl command reads your key from the JAMFRAME_API_KEY environment variable. To make a key, see
API keys. To send the same JSON body from Node.js or Python, see the
examples in Render images and PDFs.
You can also change a style in a request, such as "headline.color": "#ff0000". See
Modifications for every key you can send.
Make a test render
The Test render panel renders the saved template with your values, the same way the API does.
- Pick a Format: PNG, JPEG, WebP or PDF.
- Optional: pick a language under Translate to translate every text layer with AI. Leave it on No to keep your own text.
- Optional, only for templates with several pages: type the pages you want under Pages, such as
1, 3. Leave it empty for every page. - Edit the values under Modifications (JSON). It starts with the template’s current values. Change a value, or delete a line to keep the template’s own value.
- Click Test render.
For example:
{
  "headline": "Summer sale: 30% off",
  "photo": "https://example.com/beach.jpg"
}
Modifications (JSON) must be one JSON object of keys and values. Each value is text, a number,
true, false or null. If something is wrong, a red message under the box says what, and the button
stays off until you fix it. Click Reset to example to go back to the starting values.
The result
The file shows next to the inputs, or under them on a phone. Above it, one line sums up the render: the credits it used, the AI credits (when AI ran), how long it took, the number of pages and the format.
- Images: click an image to open it full size. With several pages, each image has its page number.
- PDF: click Open PDF.
- Warnings: a list under the summary tells you about problems that didn’t stop the render, such as a key that matches nothing in the template.
The links to the files work for an hour. The render is also listed on the Renders page as Editor test render. See Renders.
If the button is off or the render fails
| Message | What to do |
|---|---|
| Save your changes first: renders use the last saved version. | Click Save in the editor’s top bar. |
| Test renders need editor access to this workspace: they use its credits. | Ask a workspace owner or admin for editor access. |
| Out of render credits. | Your organization has used its render credits for this period. See Credits. |
| Out of AI credits. | Translation or an AI layer needed AI credits. Pick No under Translate, or see Credits. |
What a test render costs
A test render is a real render. It uses 1 render credit per image, or per page of a PDF. Renders that fail are free.
Translation and AI layers use AI credits as well. A repeat with the same values is free. See AI at render time.
What next
- Make a link that renders the template: Dynamic URLs.
- Let anyone fill in the template: Forms.
- Call the API from your code: Render images and PDFs, or open the API reference (opens in a new tab).
Last updated
Still stuck?
Email [email protected] and a real person will reply. Tell us the template you were using and what you expected to happen.